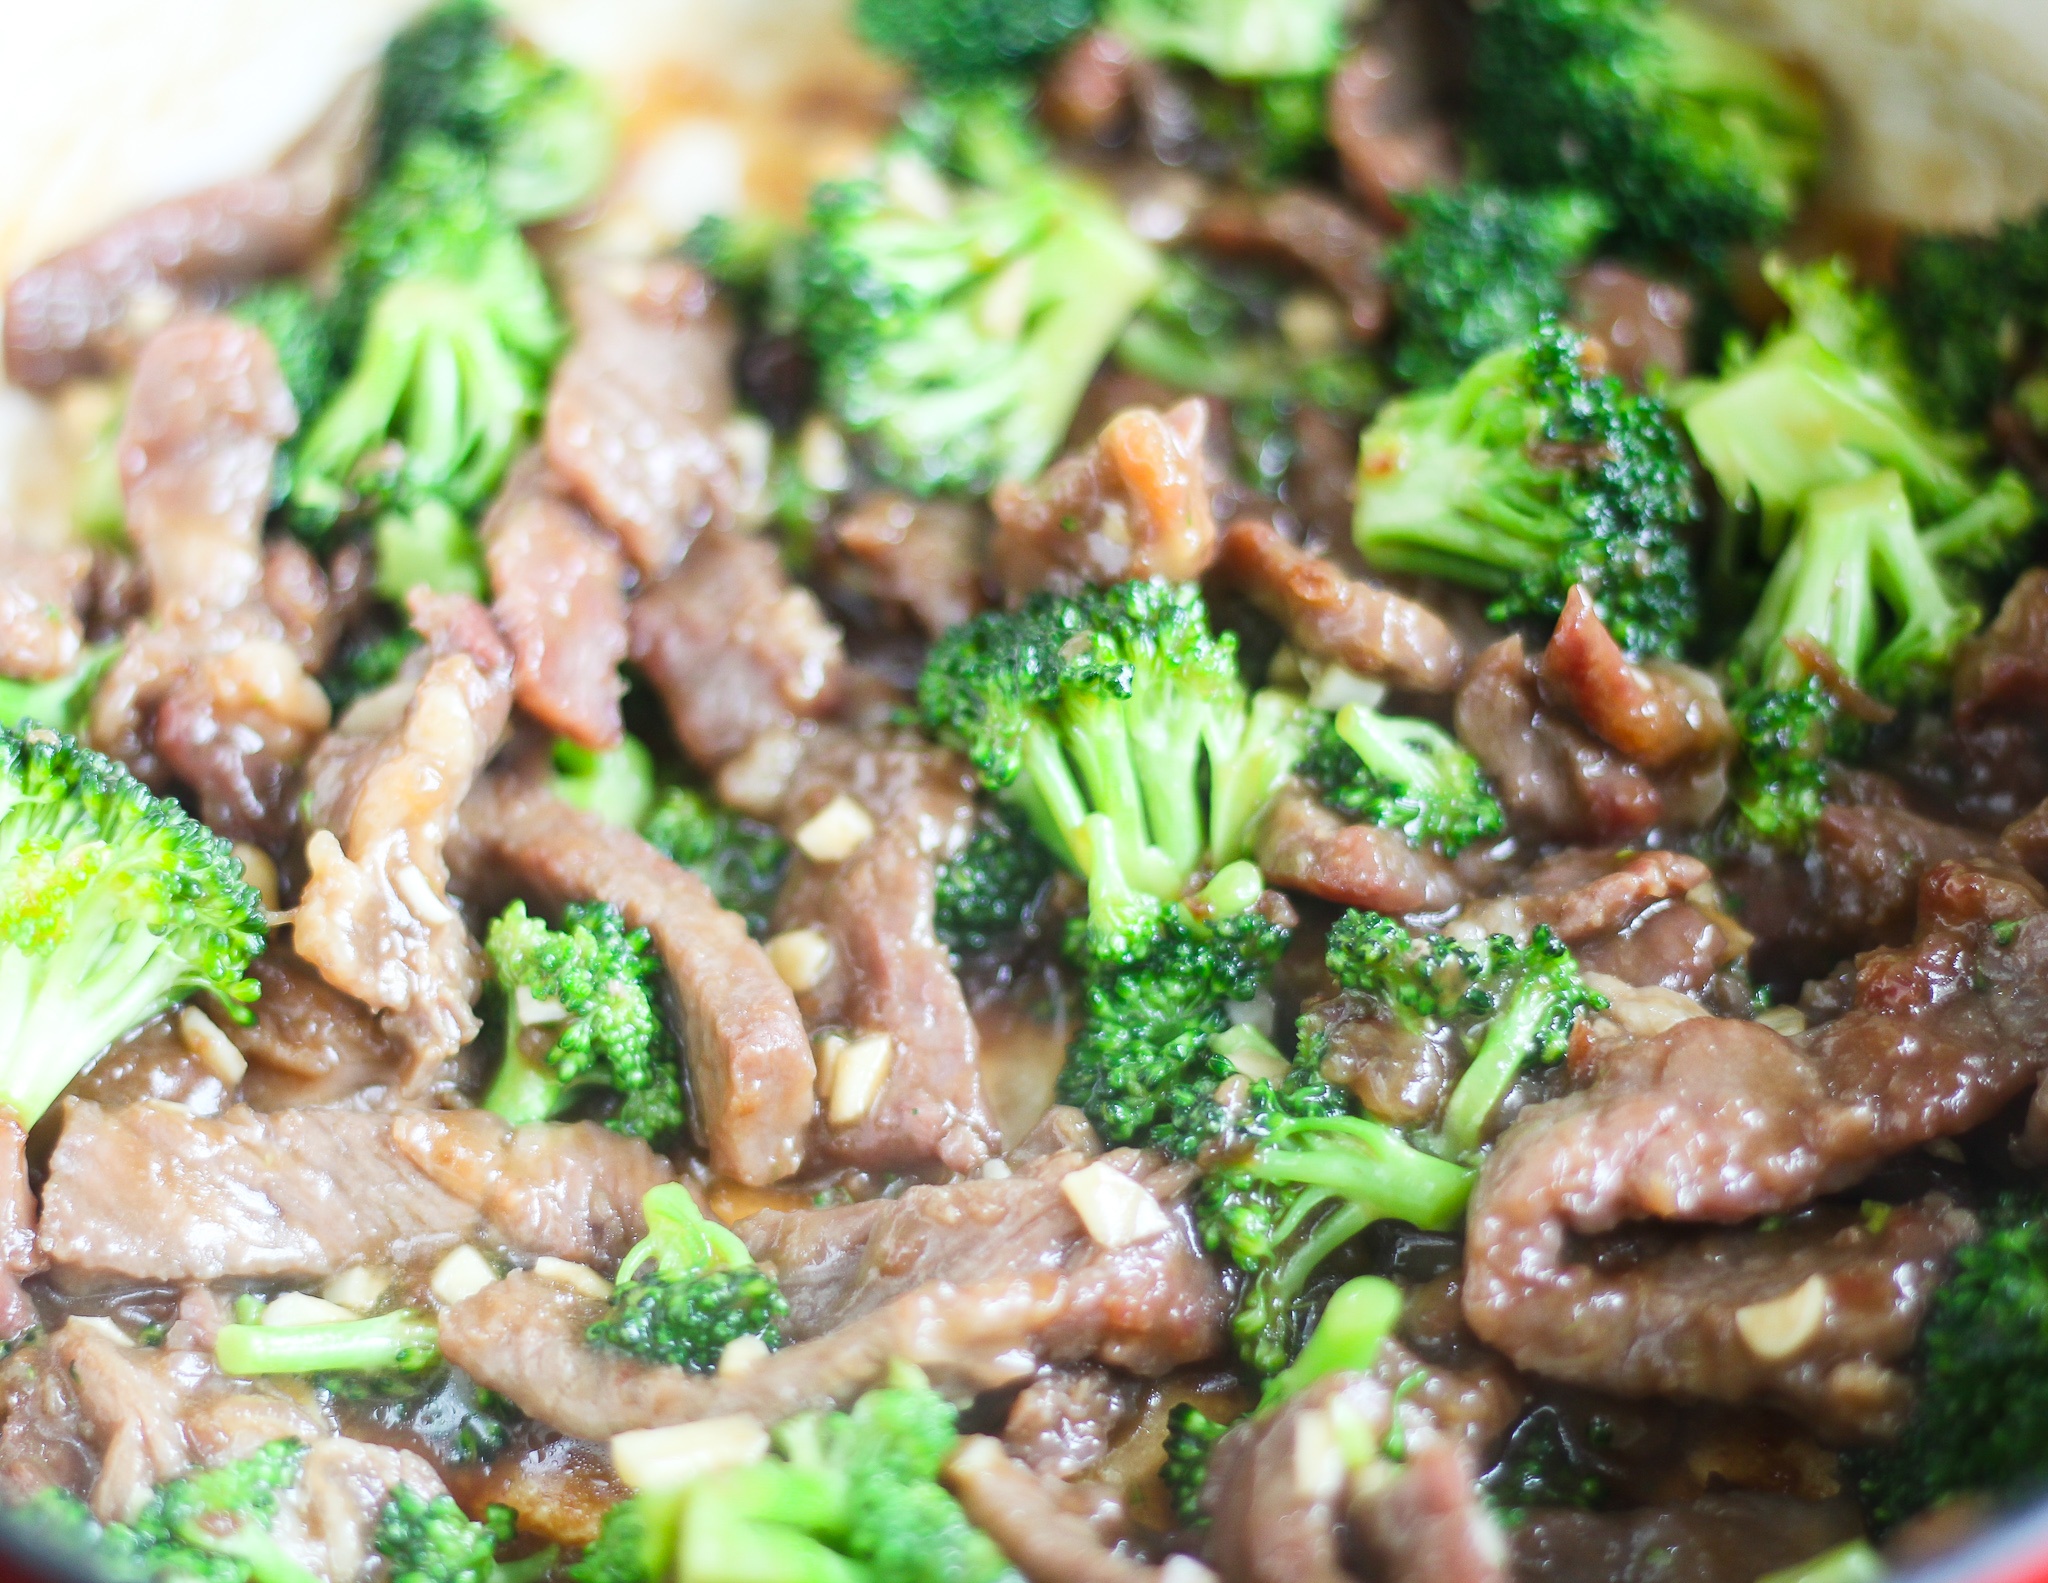
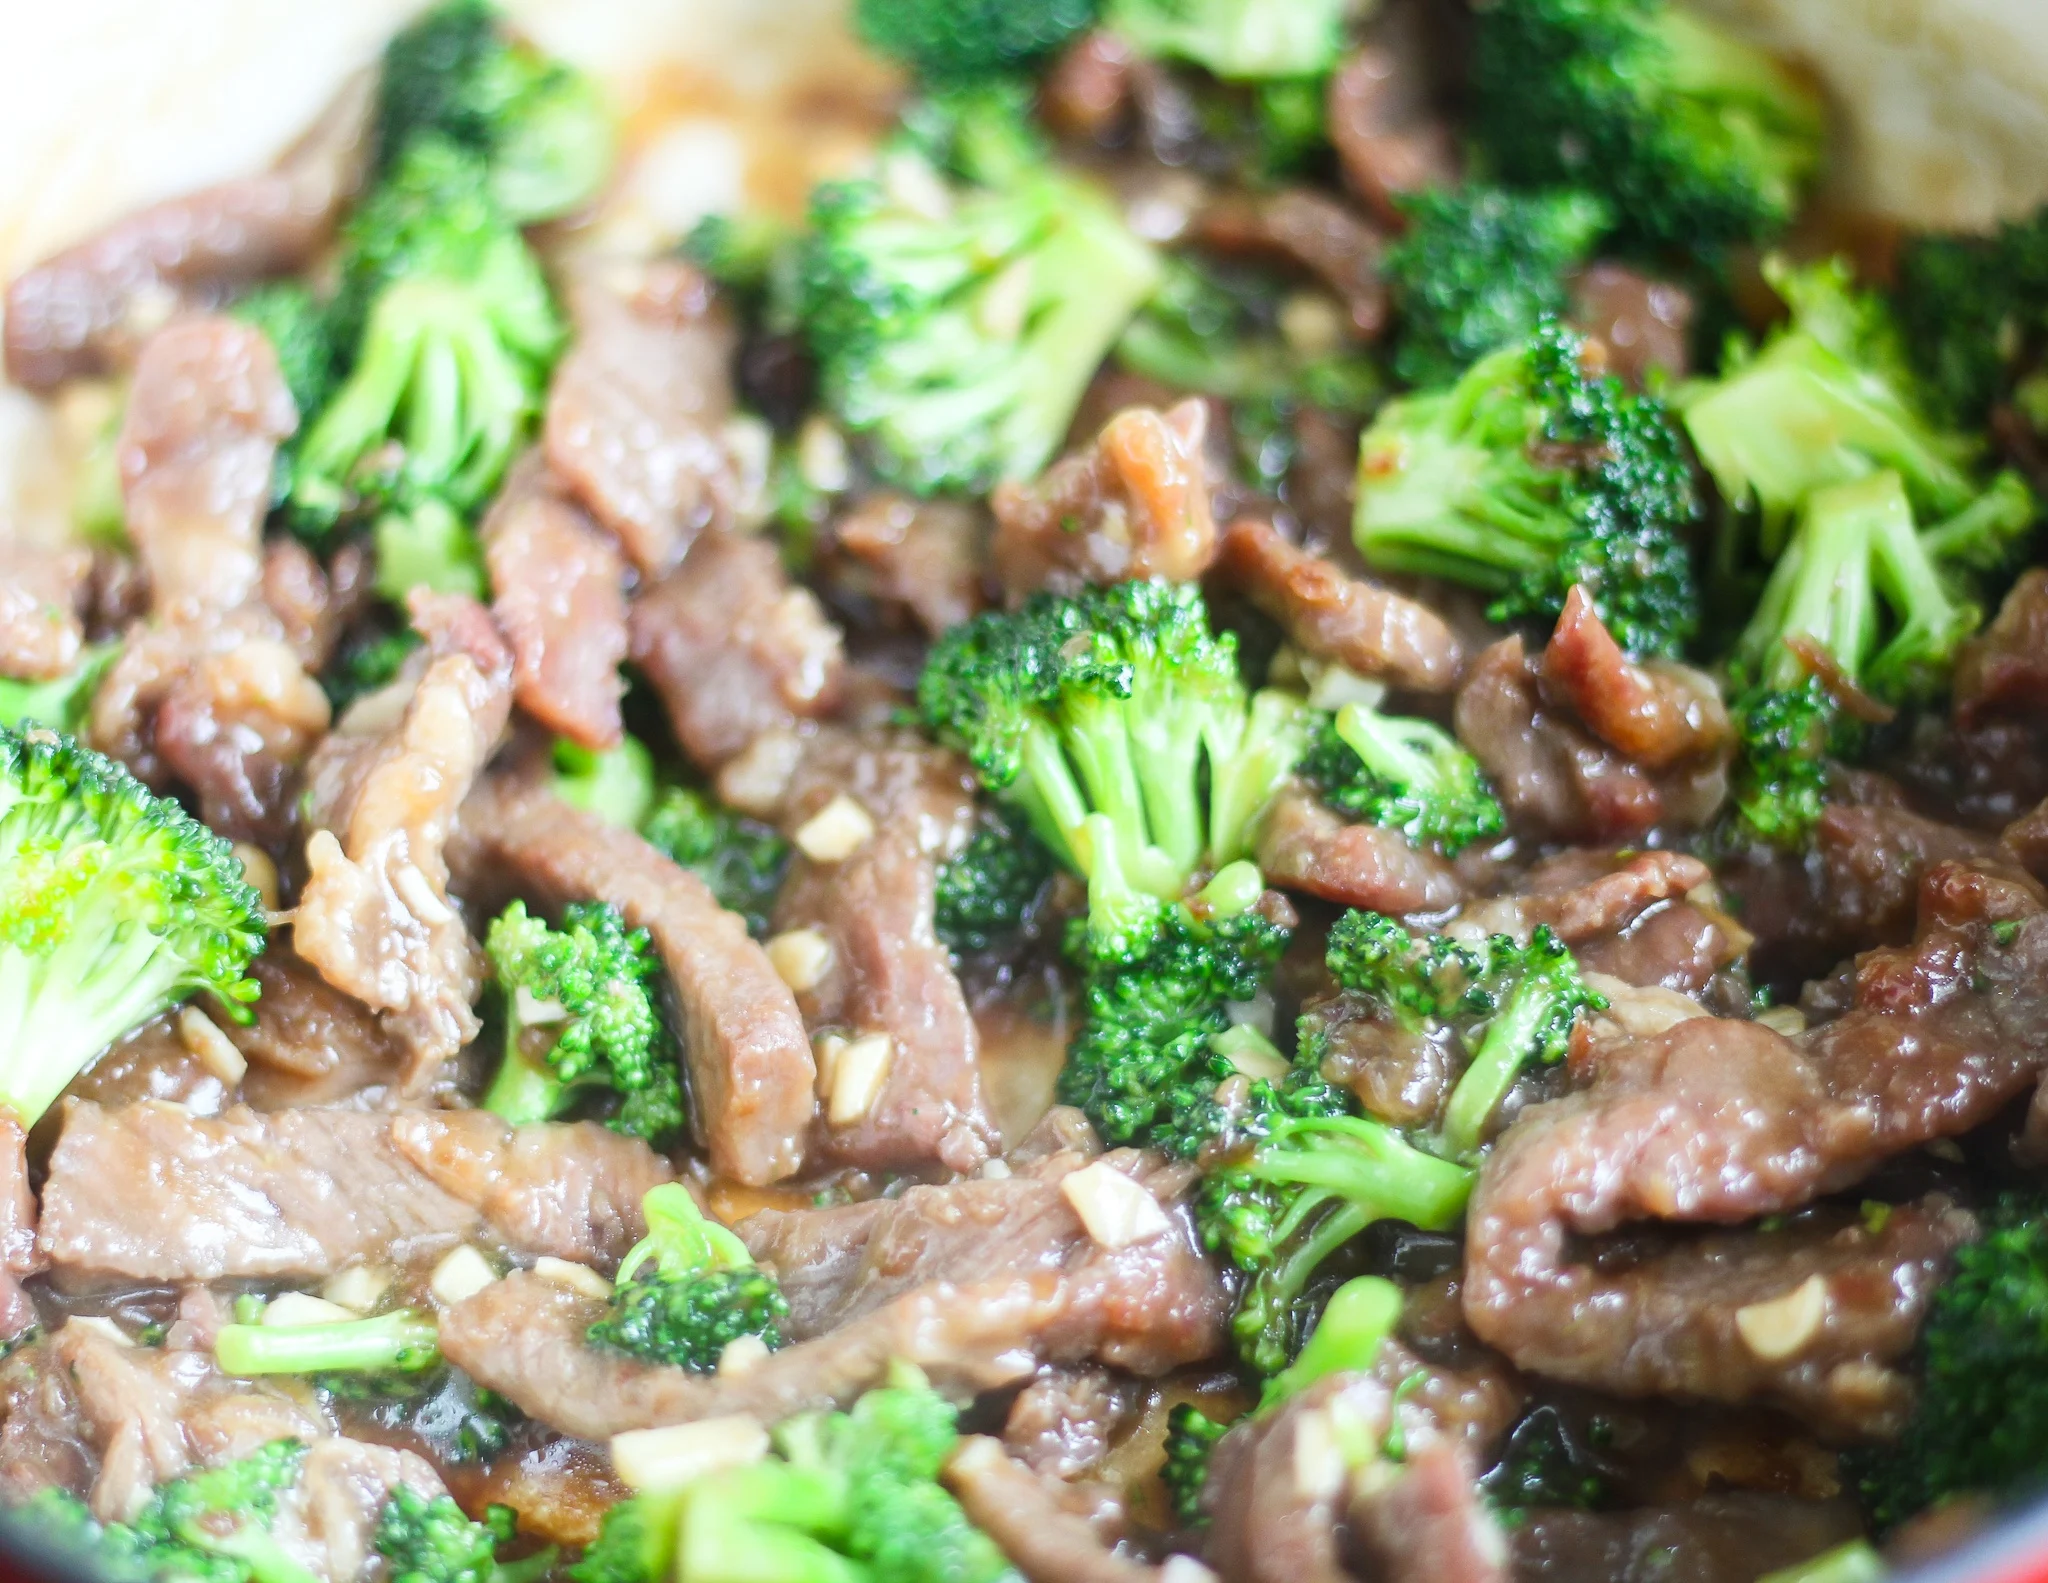
cooking

Last week Kayla and I decided that we would try our hand at making homemade mozzarella cheese. We had heard how easy it was to make, and we both love fresh mozzarella, so we decided to give it a try!

IMG_4894


Making the cheese was really easy. We purchased a kit on Amazon that had all we needed. The only thing we had to buy is a gallon of milk. Within minutes we could see things happening in our pan.

IMG_4890


Honestly, when I cook with my daughter like this, I am thinking to myself — who needs textbooks? With making cheese, we studied Science (the how and why behind it) and then the history (how the cheese got started in the first place). Really — if you are thinking about using the unschooling method (which we are considering for next year), it’s things like this that make that a good choice :)

IMG_4891

Once all the curds come together, you have to remove them from the whey and get all the liquid apart from it. We used a mesh strainer which worked really well. They whey can be saved (which is the liquid) and used in things like breads and creams, but we just decided to discard ours.

After you have all your curds, then you get to stretch it and pull it for a bit, and then roll it into a ball.

IMG_4893

Before long, you will have a beautiful ball of mozzarella cheese that is shiny and delicious! This was such fun and took about 40 minutes from start to finish.

I used it on pizza one night and it melts so smoothly. Here is the recipe for making your own mozzarella cheese at home.

How to Make Homemade Mozzarella Cheese
 

Ingredients
  • 1¼ cup water
  • 1½ teaspoon citric acid
  • ¼ rennet tablet or ¼ teaspoon liquid rennet
  • 1 gallon milk, whole or 2%, not ultra-pasteurized
  • 1 teaspoon kosher salt

Instructions
  1. Measure out 1 cup of water. Stir in the citric acid until dissolved. Measure out ¼ cup of water in a separate bowl. Stir in the rennet until dissolved.
  2. Pour the milk into the pot. Stir in the citric acid solution. Set the pot over medium-high heat and warm to 90°F, stirring gently.
  3. Remove the pot from heat and gently stir in the rennet solution. Count to 30. Stop stirring, cover the pot, and let it sit undisturbed for 5 minutes.
  4. After five minutes, the milk should have set. It will look kind of like tofu. If it is still liquidy, re-cover the pot and let it sit for another five minutes. Once the milk has set, cut it into uniform curds: make several parallel cuts vertically through the curds and then several parallel cuts horizontally, creating a grid-like pattern. Make sure your knife reaches all the way to the bottom of the pan.
  5. Place the pot back on the stove over medium heat and warm the curds to 105°F. Stir slowly as the curds warm, but try not to break them up too much. The curds will eventually clump together and separate more completely from the yellow whey.
  6. Remove the pan from the heat and continue stirring gently for another 5 minutes.
  7. Ladle the curds into a microwave-safe bowl with the slotted spoon.
  8. Microwave the curds for one minute. Drain off the whey. Put on your rubber gloves and fold the curds over on themselves a few times. At this point, the curds will still be very loose and cottage-cheese-like.
  9. Microwave the curds for another 30 seconds and check their internal temperature. If the temperature has reached 135°F, continue with stretching the curds. If not, continue microwaving in 30-second bursts until they reach temperature. The curds need to reach this temperature in order to stretch properly.
  10. Sprinkle the salt over the cheese and squish it with your fingers to incorporate. Using both hands, stretch and fold the curds repeatedly. It will start to tighten, become firm, and take on a glossy sheen. When this happens, you are ready to shape the mozzarella. Make one large ball, two smaller balls, or several bite-sized bocconcini. Try not to over-work the mozzarella.
  11. The mozzarella can be used immediately or kept refrigerated for a week. To refrigerate, place the mozzarella in a small container. Mix a teaspoon of salt with a cup of cool whey and pour this over the mozzarella. Cover and refrigerate.

What types of foods have you been making homemade?

Did you like this? Share it:

I have been baking like a mad woman today — 3 pies (one of which I am sharing with you today — Chocolate Pecan Pie), sweet potatoes, one of my two turkeys, eggs for all kinds of things, cornbread for dressing — and the list just keeps going! AHHH! :)

My sanity will return sometime this weekend!

In the meantime, I wanted to share this yummy recipe I made today. It is HEAVENLY!

5.0 from 1 reviews

Chocolate Pecan Pie
 

Ingredients
  • 1 (9-inch) unbaked pie shell
  • 2 cups pecan halves
  • 3 large eggs, beaten
  • 3 tablespoons butter, melted
  • ½ cup dark corn syrup
  • 1 cup sugar
  • 3 ounces semisweet chocolate, chopped

Instructions
  1. Preheat the oven to 375 degrees F.
  2. Cover bottom of pie crust with pecans.
  3. In a medium bowl, whisk together the eggs and melted butter. Add the corn syrup, sugar, and the chopped chocolate. Stir until all ingredients are combined. Pour mixture into the pie shell over the pecans and place on a heavy-duty cookie sheet.
  4. Bake for 10 minutes. Lower the oven temperature to 350 degrees F and continue to bake for an additional 25 minutes or until pie is set. Remove from oven and cool on a wire rack.

I have a couple of more recipes to share with you over the weekend — Chess Pie, Chocolate Peanut Butter Pie, Southern Cornbread Dressing, and jellied cranberry sauce. Then next week, I will share some leftover recipes with you that I created with our TONS of turkey that I happen to be cooking.

Have a Happy Tanksgiving (as Madea says!)

Did you like this? Share it:

 Reprint from 2011. 

Kayla is really into baking now. She and a friend made these Chocolate Kiss Cookies during Christmas (that is why they are red and green). However, you can put whatever color sprinkles you want on them–red and blue for the 4th of July, pink and yellow for Easter, orange and black for Halloween–the possibilities are ENDLESS!

Here is how she made them!

This recipe is one of those that you want to add to your everyday holiday collection. You can make a batch of these and give them away as holiday gifts to all your family members.

Did you like this? Share it:

It’s fall, and that usually means pumpkin time in our home! We spend the first part of fall visiting the pumpkin patch to get tons of pumpkins, and then Kayla and I set out to create delicious pumpkin recipes from the puree and seeds we get!

How to Roast a Pumpkin: First thing is — you need to know how to roast a pumpkin. In this post I share my tips for making your homemade pumpkin puree.

5 Pumpkin Recipes You Can Make Right Now

  1. Pumpkin Chocolate Chip Cookies: These are SO good. You will love the delicate pumpkin flavor mixed with the chocolate chips.
  2. Pumpkin Bread: The fall is never complete without yummy homemade pumpkin bread.
  3. Pumpkin Cheesecake Swirls: For the cheesecake lover, you will definitely want to make this little heavenly bites! Each one is filled with just a bit of pumpkin and cream cheese with a tony graham cracker crust.
  4. Roasted Pumpkin Seeds: Every year once we get our pumpkin, roasted pumpkin seeds are the first thing we make. It’s a healthy snack that my kids enjoy!
  5. Pumpkin Custard with Gingersnaps: This is our new favorite recipe! We first tasted it at Cracker Barrel. You will LOVE it!

And — here’s one for the road. Kayla loves to make Pumpkin Flan. It’s really easy. It may sound difficult but it is not. If my 14 year old can fix this dish, so can you!

So what delicious pumpkin dishes have you been creating?


Did you like this? Share it:

I have been trying to fix rice like you get in a Mexican restaurant FOREVER — and I finally found the right recipe for it. Marcela from Mexican Made Easy really opened my eyes on how to make your rice fluffy and get it to taste like the delicious rice at my favorite Mexican restaurant.

Now my meal can be complete.

I can serve this rice with any of my delicious Mexican dishes like Chicken Verde Casserole, Mango Salsa Chicken, Roasted Pork Tacos, or homemade chips and salsa.

Homemade Mexican Fried Rice
Author: 
Recipe type: side dish
Cuisine: Mexican
Prep time: 
Cook time: 
Total time: 


This rice is so delicious and really easy to make. It will make any Mexican dish come alive
Ingredients
  • 1 tablespoon olive oil
  • 1 cup long grain white rice
  • ½ cup finely chopped white onion
  • 1 clove garlic, minced
  • 2¼ cups chicken broth
  • 3 tablespoons tomato paste
  • 1¼ teaspoon kosher salt
  • 1 jalapeno, diced
  • 1 tablespoon of chopped fresh cilantro

Instructions
  1. In a large heavy saucepan, heat the olive oil on medium-high heat. Add the rice, onions and garlic.
  2. Saute until the rice has an opaque color and is fragrant, about 2 minutes.
  3. Add the chicken broth, tomato paste and salt. Mix well to incorporate evenly.
  4. Then add in the jalapeno pepper and cilantro.
  5. Cover, reduce the heat to low, and simmer until rice is ready, about 30 minutes.
  6. Fluff with a fork and serve immediately.

Rice is an essential side dish when fixing a Mexican meal for your family. If you are really up for a challenge, why not create a Mexican theme night and make it a family fun night?

  • Watch a movie like Nacho Libre (one of our favorite movies ever!)
  • Make string art
  • Do a Mexican hat dance and act silly with your family
  • and then serve a delicious Mexican meal to round out the night!

All of these things I have done with my own family — especially when we have studied those countries for school!

What is your favorite Mexican cuisine?

Did you like this? Share it:

My daughter is quickly becoming a rockstar in the kitchen. I had NO IDEA that she would love baking and cooking as much as she did. The other night she had a taste for chocolate, caramel, nuts, and deliciousness. She found this recipe in one of my old cookbooks so we got to work — in meaning I watched and supervised as my 14 year old created this scrumptious recipe for Chocolate Caramel Brownies.

Serious heaven on a plate.

Chocolate Caramel Brownies
Recipe type: dessert
Prep time: 
Cook time: 
Total time: 

Serves: 10
 

Ingredients
  • For the brownies:
  • 1 cup (2 sticks) butter
  • 12 ounces semisweet chocolate, coarsely chopped
  • 1½ cups sugar
  • 4 large eggs
  • 1 tablespoon vanilla extract
  • 1¼ cups all-purpose flour
  • ½ teaspoon salt
  • 1½ cups pecans, coarsely chopped
  • 1 cup semisweet chocolate chips (for the topping)
  • For the caramel filling:
  • 14 ounces caramel candies, unwrapped
  • ¼ cup heavy cream

Instructions
  1. Preheat the oven to 350˚ F.
  2. Line a 9×13-inch baking pan with foil (very important!) and grease the foil well with butter or cooking spray.
  3. In a large, microwave-safe bowl, combine the chopped chocolate and butter. Microwave in intervals of 30 seonds at 50% power until the chocolate is melted and the mixture is smooth, stirring in between intervals.
  4. Whisk in the sugar, eggs and vanilla until incorporated. Stir in the flour and salt just until combined.
  5. Spread about half of the brownie batter in the bottom of the prepared pan in an even layer. Bake for 16 minutes.
  6. Remove from the oven and let the brownies cool for 20 minutes. Be sure and leave the oven on.
  7. Meanwhile, add the chopped pecans to a medium skillet over medium heat. Toast, stirring occasionally, until fragrant and light golden brown. Remove from the heat and set aside.
  8. To make the caramel filling, combine the caramels and cream in a sauce pan. Melt on medium heat and stir until completely smooth. Keep a close eye on the mixture as it can burn very easily.
  9. Stir in half of the pecans to the caramel mixture. Immediately spread the caramel mixture over the bottom brownie layer. Be careful as it will lift the brownie some.
  10. Scoop the remaining brownie batter in spoonfuls over the caramel layer and spread it evenly across the caramel layer (spooning the batter in piles over the caramel will help to get an even layer of batter over the caramel).
  11. Sprinkle the chocolate chips and the remaining pecans on top of the final brownie layer. Bake for 20 minutes.
  12. Transfer to a wire rack and let cool completely before slicing and serving.
  13. Lift the brownies from the pan using the edges of the foil. Remove the foil and cut the brownies into individual squares. Store in an airtight container.

Did you like this? Share it:

I loving creating homemade Chinese takeout from home. It is so much cheaper and the taste is something you just wouldn’t believe. Before now, anytime I made Sweet N Sour Chicken, I always bought my sauce from the store because I thought it was hard to make. The other night, I made a sauce for my chicken that is TO DIE FOR. If you make this delicious Homemade Sweet N Sour Sauce, you will never go back to store bought again.

Homemade Sweet N Sour Sauce
Recipe type: entree
Prep time: 
Cook time: 
Total time: 

Serves: 6
 

Never buy store bought sauce again
Ingredients
  • To coat the chicken you will need
  • 5 chicken breast
  • salt and pepper
  • 1 cup cornstarch
  • 2 eggs, beaten
  • ⅓ cup canola oil
  • For the Sauce You Will Need
  • ¾ cups sugar
  • 4 Tablespoons ketchup
  • ½ cup white distilled vinegar
  • 1 Tablespoon soy sauce
  • 1 teaspoon garlic salt

Instructions
  1. For the chicken
  2. Rinse chicken and then cut into 1 inch cubes. Season with salt and pepper.
  3. Dip chicken into cornstarch and coat all the way and then into eggs.
  4. Heat oil in large skillet. Cook chicken until just starting to turn brown, but not done all the way. Place in a 9×13 baking dish.
  5. For the Sauce
  6. Preheat oven to 350 degrees.
  7. Whisk until smooth then pour evenly over chicken.
  8. Turn chicken so the sauce gets on both sides and then put in the oven and cook for one hour. Baste chicken and move around every fifteen minutes so chicken can get sauce all over it.
  9. By the time the hour rolls around the chicken will be nice and sticky with sauce and delicious!

Next time you want Chinese, don’t order out. Make your own and LOVE the fact that you know what is in your sauces and food that you are feeding your family :)

Did you like this? Share it:

Tonight, I made a few new dishes for our Chinese meal. Homemade sweet-n-sour sauce, coconut chicken, and this delicious, “tastes just like takeout” Crockpot Beef and Broccoli.

I am telling you, when I first saw this recipe on BS Recipes, I was like — NO WAY! Every single beef and broccoli recipe I have ever tried just did not even taste right. This one is spot on (as Chef Ramsey would say) :) I cooked it just like she said to. The only change I made was using olive oil in place of sesame oil. It still turned out delicious.

I will tell you that when you go to the store to look for Beef Consumme, go directly to the Campbell’s soup aisle. I walked aisle after aisle before Googling it on my phone and finding it. I will save you the trouble and just tell you where to get it!

My daughter would not keep her fork out of the crockpot. I kept telling her to wait for supper but she said she was starving.

Next time, I am going to add slivered carrots and red pepper strips to it I think.

5.0 from 2 reviews

Crockpot Beef and Broccoli
Author: 
Recipe type: entree
 

You will never want take out again after making this delicious Crockpot Beef and Broccoli
Ingredients
  • 1 pound boneless beef chuck roast, sliced into thin strips
  • 1 cup beef consumme
  • ½ cup soy sauce
  • ⅓ cup brown sugar
  • 1 tablespoon olive oil
  • 3 garlic cloves, minced
  • ****Put the following ingredients in after the first cook time of 6-8 hours***
  • 2 tablespoons cornstarch
  • 2 tablespoons sauce from the crock pot after being cooked
  • Fresh broccoli florets (as many as desired)
  • Hot cooked rice

Instructions
  1. Slice beef in thin slices (doing this from a half frozen roast and then place beef in a crock pot.
  2. In a small bowl, combine consomme, soy sauce, brown sugar, oil, and garlic. Pour over beef. Cook on low for 6-8 hours.
  3. At the end of your cook time, stir cornstarch and sauce in a cup until combined and then pour in the crockpot with the beef and sauce.
  4. Mix it together until smooth.
  5. Add broccoli to the crock pot. Stir to combine. (also add any other veggies at this time as well)
  6. Cover and cook an additional 30 minutes on high.
  7. Serve over hot cooked rice.

This post is participating in these hops: Tempt My Tummy Tuesdays
Tuesdays at the Table
Tasty Tuesday
Slightly Indulgent Tuesday
Hearth and Soul Hop
Tasty Tuesday Link Party
This Week’s Cravings
Delicious Dishes
Totally Tasty Tuesday
Try a New Recipe Tuesday
Kids in the Kitchen

Did you like this? Share it:

Cooking with children is a wonderful way for adults to spend quality time with a child while also teaching them an important skill that they will use for the rest of their life. Additionally, children are naturally drawn to cooking activities as they tend to appeal to their creativity and active personalities.

While the advantages of cooking with children are well-known, many parents struggle with knowing at what age to begin cooking activities and how to keep their children safe in the kitchen. The following guide will help parents to safely teach their child cooking skills at any age while sharing in a delightful culinary experience.

Benefits of Cooking 

Learning how to cook has many benefits for children. As they cook, children learn about the importance of diligence, patience and paying attention to details as cooking is a methodical process that requires completing a series of steps. Following a recipe exactly will help children to focus on details while also reinforcing important reading and mathematical skills.

Measuring out ingredients and observing their reactions to mixing, heat and other ingredients can also build their understanding of science. Additionally, time spent together in the kitchen enhances bonding and encourages conversation between parents and their children.

Safety Precautions 

When cooking with children, it is important to implement safety practices that will keep children from being hurt while also teaching them important lessons regarding sanitation and fire safety. Parents of young children may prefer to begin with recipes that require no cooking, or they can complete the stove or oven portion of the recipe once the child has mixed the ingredients.

Even with older children, adults will need to provide supervision any time that a child is cooking with heat. For additional peace of mind, an alarm system should be set up within the home such as the type available at www.WirelessAlarmSystems.com so that any potential emergencies can be taken care of quickly.

Fun and Simple Recipes 

There are many great recipes designed for cooking with children that can be found either in special cookbooks or online. Many times, an old favorite family recipe can also be adapted to be child-friendly. Young children do the best with simple recipes that involve only a few ingredients and a little mixing. Instant puddings, icing for cupcakes and brownies are a few favorites of young children.

They may also enjoy arranging fruit and vegetables into face or insect shapes. Older children can begin to cook more complicated recipes such as classic chocolate chip cookies. Once they are old enough to use the stove, then they can learn simple cooking skills such as how to brown hamburger meat or scramble eggs.

Teaching children how to cook is a fun way to teach important concepts to children while also sharing some laughter and conversation. When children help in the kitchen, they are more likely to try new foods and experiment with healthy eating.

While parents should always be careful to keep safety in mind when cooking with children, kids of all ages can get involved in planning and cooking meals for the whole family to enjoy.

Did you like this? Share it:

This month for the Improv Cooking Challenge, our goal was to make something using tomatoes and peppers. These two veggies pair so well together that there was a plethora of recipes to choose from. I wanted to make something totally different than I have ever made before, so I settled on this recipe for Orzo with Tomatoes and Peppers from Cook Like a Champion.

Orzo is a small pasta. It is really good and goes well with anything basically. Hope you enjoy this recipe. Be sure to check out all the other recipes in the cooking challenge.

Orzo with Tomatoes and Peppers-Improv Cooking Challenge
Author: 
Recipe type: entree
Prep time: 
Cook time: 
Total time: 

Serves: 6
 

You will love this pasta mixed with tomatoes and peppers
Ingredients
  • 3 cups chicken broth
  • 3 cups water
  • 1 pound orzo pasta
  • 2 tablespoons olive oil
  • ½ pound of spicy Italian sausage
  • 1 garlic clove, minced
  • 2 roasted red peppers, cut in ¼-inch strips
  • 2 plum tomatoes, chopped
  • ¼ teaspoon red pepper flakes
  • 2 tablespoons chopped fresh parsley
  • Salt and freshly ground black pepper
  • ½ cup freshly grated Parmesan

Instructions
  1. In a large saucepan, bring the chicken broth and water to a boil over high heat. Add the pasta and cook until al dente, 8 to 10 minutes.
  2. Meanwhile, heat the oil in a large skillet set over medium-high heat. Add the sausage and sauté, breaking up any large pieces, until cooked through, about 5 minutes.
  3. Add the garlic and continue cooking an additional minute.
  4. Add the peppers, tomatoes and red pepper flakes and continue cooking 2 more minutes.
  5. Drain the pasta, reserving ½ cup of the cooking liquid. Transfer pasta to a large serving bowl, then stir in sausage mixture, 1 tablespoon parsley and salt and pepper to taste.
  6. Toss to combine, adding the cooking liquid as needed to loosen the pasta. Top with remaining parsley, sprinkle with Parmesan and serve.

What have you been cooking lately?

Did you like this? Share it:

I found a new sauce that I love. Chimichurri :) yum, yum, yum! I have seen it on many different steaks, and to be honest, I always thought it was too hard to make. Then I realized how easy it is to make. If you are growing your own herb garden, that will make it even cheaper to make! (we are always about looking for ways to save money, right?)

Chimichurri Sauce
Author: 
Recipe type: Sauce
Prep time: 
Cook time: 
Total time: 

Serves: 8
 

Chimichurri sauce will dress up any steak and give it that punch of flavor that you are looking for!
Ingredients
  • 1 cup of flat leaf parsley
  • ½ cup of olive oil
  • ⅓ cup red wine vinegar
  • ¼ cup cilantro
  • 1 clove of garlic
  • ½ teaspoon of crushed red pepper
  • ½ teaspoon cumin
  • ½ teaspoon of kosher salt

Instructions
  1. Combine all ingredients in a food processor or blender and chop. Use the puree function to get it as smooth as possible. Transfer to a bowl with a lid and place in the refrigerator until ready to use.
  2. Can be refrigerated for up to a week.


Did you like this? Share it:

When Kayla and I fixed the puff pastry burgers that you read about yesterday, we had a little puff dough left over so Kayla decided to cook it.

It was one single square and it puffed up nice and beautiful. After it came out of the oven, she melted some chocolate to drizzle over it and put some strawberry preserves on it. It was out of this world delicious!

It made me want to make some desserts using Puff pastry.

Do you have any special recipes using this item? I would love to hear  about them!

Pin It
Did you like this? Share it:

One day I was watching Paula Deen on Food Network and she made these delicious looking Puff Pastry Burgers. I thought to myself, hey I can do that!

This recipe is SO much fun because you can add anything inside the puff pastry to create the best burger ever! I have added in the past, cole slaw, avocado, bacon, tomato, french fries, etc. The possibilities are endless!

So how do you make them?


Pin It
Did you like this? Share it:

I get asked all the time, why do you cook all the time? It’s funny that you should ask that because I have been thinking about writing a post on why I cook all the time.

I guess the main reason that I do so much cooking is because I love feeding my family. To me, cooking is a way to show them that I care about them and love them. I hate to see families where the kids are always asking whats for supper and when they find out its just another fast food meal, they get sad.

The joy on my son and daughter’s faces when they see that I have made another delicious meal makes me all happy inside. I can’t explain it. :) The look of love on my hubby’s face when he sees his favorite meal being prepared is a joy to my heart.

Food means a close family. Ya know that old saying that a family that eats together. . .no wait. That’s the family that prays together stays together. Same thing for those who eat together. It is a proven fact that when you have dinner together with your family, you build bonds, you grow closer, and you spend time talking to the ones you love the most.

Food means time spent together. When my kids want to make something in the kitchen, we spend time together eating and talking and laughing–just having a good time. Plus they are learning some very special skills that will come in handy when they get out on their own. And they get to lick the spoon :)

So the next time you are looking for something to do with your family, find a recipe you’ve been wanting to try, get the fam in the kitchen and bake away! You never know what kind of creation you will come up with :)

What family traditions are you making?

Are you spending time with your family?


Did you like this? Share it:

I discovered by accident that I can make homemade potato chips! They are so good. Look at them!

If you have a mandolin (potato cutter) then you can make these too! Put it on the super thin slices setting. Slice your potatoes. Heat your oil. Place your slices in the oil and cook until they are crisp.

Remove then and then drain them on a towel. Sprinkle with salt and VOILA! You have potato chips!

Super easy and very delicious :)

Did you like this? Share it:

If your budget is tight and you are looking for a delicious Chinese tasting meal, then this recipe will be right up your alley. I found this one while reviewing the E-Mealz website (review coming soon). I did change it up some since a few of the ingredients I did not have on hand.

Here is the recipe. I hope you enjoy it :)

Did you like this? Share it:

The peeps at Food Network all say the same thing–“There’s nothing like homemade mayo.”

I decided to give it a try.

Results? Hellooooo delicious goodness! Come to momma :)

Here is the recipe. Try it. Enjoy it. Never buy store bought again.

Did you like this? Share it:

Secret Recipe Club

Today is the day that I get to reveal the blog I was paired with for the Secret Recipe Club!

First off, let me show you what I made!

I love homemade sauces. They are my absolute favorites! So I knew when I saw this recipe for Roasted Garlic Tomato Sauce–I was going to make it.

This recipe can be discovered at Hezzi D’s Books and Cooks! When I first went to her website, I was drooling! She has so many delicious recipes to share! She even has another one that I intend on trying later for Cuban Pork Chops (she loves Bobby Flay too!)

I did not alter this recipe at all. Her version was SO delicious!

Enjoy!


Did you like this? Share it:

Living out in the country and not just “around the corner” from the grocery store has me finding ways to improvise when I run out of things.

This week–that was my beloved French Vanilla Coffee Creamer! :)

That is a very bad no-no.

Mama needs her creamer–just saying :)

I did some research on the Internet and found just the recipe to use! Mrs. Happy Homemaker made her own creamer using sweetened condensed canned milk, milk, and vanilla–so I figured I could try too!

The results?

Creamer of course! It’s really easy to make and so much cheaper than the stuff you buy at the store. And. . . if you really want to get creative, you can make your sweetened condensed milk like I did!

Here is the recipe. Hope you enjoy!

Voila!

Your own creamer! The results are delish!

Did you like this? Share it:

Photobucket

I joined the Crazy Cooking Challenge from Mom’s Crazy Cooking this month! This is the first ever challenge and guess what it is? Mac and Cheese!!!!!

I scoured the web and thousands of recipes for that “perfect” mac and cheese recipe and I finally found the one I wanted to make. The original recipe comes from Fete and Feast. I have bookmarked this site so I can go back and look over it and find more yummy recipes to try!

Here is the recipe. Hope you enjoy!!


Did you like this? Share it:

About Jennifer

JenniferHi! I am Jen--a wife to the most amazing man ever and a homeschool mom to one teenager. I just graduated my oldest. I have been blogging since 2007. I love to watch movies, spend time in the kitchen, crochet, dance, drink coffee, and lay on the beach. Between recipes, reviews, and hilarious life story moments you'll find many helpful posts on this blog. Welcome, pull up a chair and stay for a while!

Email Me

jennifer.sikora1@gmail.com

This blog accepts forms of cash advertising, event sponsorship, paid insertions, sponsored posts or other forms of compensation. This blog uses affiliate links within posts. Please contact me above if you are interested in working together.

Foodie BlogRoll

Connect With Jen

I’m Going!

Grab My Button

Jen's Journey
<div class="grab-button" margin: 0 auto;"> <a href="http://jennifersikora.com/" rel="nofollow"> <img src="http://i909.photobucket.com/albums/ac293/munchkin_land_designs/BlogDesigns2/JensJourneyButton1.png" alt="Jen's Journey"> </a> </div>

Check out my videos!

Latest Tweets

Jennifer Sikora
jennifer_sikora

Instagram Me

 
Enjoy more tasty food with deliciousfood4u.com

Designed By:

Munchkin Land Designs
Elements by Bekah E Designs